Learning to fly through windows in cloud
Turning a desktop learning experience into remote learning experience
Recently, I finally decided to pursue my passion for aerospace, so I enrolled into a pilot school and started theory classes to become a proud holder of PPL(A). Due to other personal commitments in my private life, I could not make it to the live classes offered by my DTO, so I opted for remote classes, hoping I could learn all the necessary theory by watching the lessons on my Android tablet that I usually use for note-taking.
Alas, that idea was immediately torn to shreds. You see, the lessons aren’t in a prerecorded video format I was hoping for. As a matter of fact, the lessons aren’t video lessons at all. My DTO actually uses a custom-made software by bristol.gs called ATPdigital which is basically a chunked textbook interspersed with plenty of quizzes, and that software works only on Windows, Mac and iOS devices. And I own neither1. ☹
This blogpost is a story of my stubborn journey to access this OS-constrained software through my Android tablet anyways 😛
Microsoft Flight Simulator IRL
From all of the available OS-es, I chose to install that software on Windows OS purely out of practical reasons: I have the most experience with it unlike the other two, I can actually get by on Windows (Mac and iOS interfaces are, for some reason, deeply unintuitive to me 🤷♂), and it’s the most easy one of the three to obtain.
Next, where do I put Windows such that I can access it from everywhere anytime? After a few discussions with my tech friends (and Gemini2), I reached the conclusion that I should simply create a virtual Windows instance in cloud and connect to it with RDP (Remote Desktop Protocol). The alternative of running a local virtualized instance on my computer (like QEMU or something) is a bad fit, due to my (apparently controversial??) habit of turning the computer off after a day’s work. For the cloud provider, I kind of defaulted to Hetzner without much thinking, as I run all my things there and they’re pretty cheap. Reflecting back, going with Azure potentially could have made my life easier, but this does work, so I’m never going to have that counterfactual.
And last, my tablet and the cloud machine are connected through a Tailscale network. While this is not strictly necessary (to quote Gemini, “Tailscale builds a secure, private tunnel between your devices. You still need to run a remote desktop application through that tunnel.”3), it does have some added benefits like security4… but if I’m being completely frank here, I admit I just needed an excuse to finally try Tailscale out, as it was on to-try list for some time. TLDR is that it works flawlessly and it’s super easy to set up.
What follows below are step-by-step instructions of how to set everything up just like I did + lessons learned.
1. Setting up a Hetzner instance with Windows Server 2025
1.1 Create any instance
Choose whatever region and pick any operating system. We’re going to destroy it
anyways in the next step, so for the most part it truly doesn’t matter. That
said, you might want to skip the absolute minimum of CPU/RAM purely because it
installs faster and performs better (snappier). I did not expect Windows Server
to be this resource hungry (and, for the record, I think ATPdigital may also
play a part in slowness of my system).

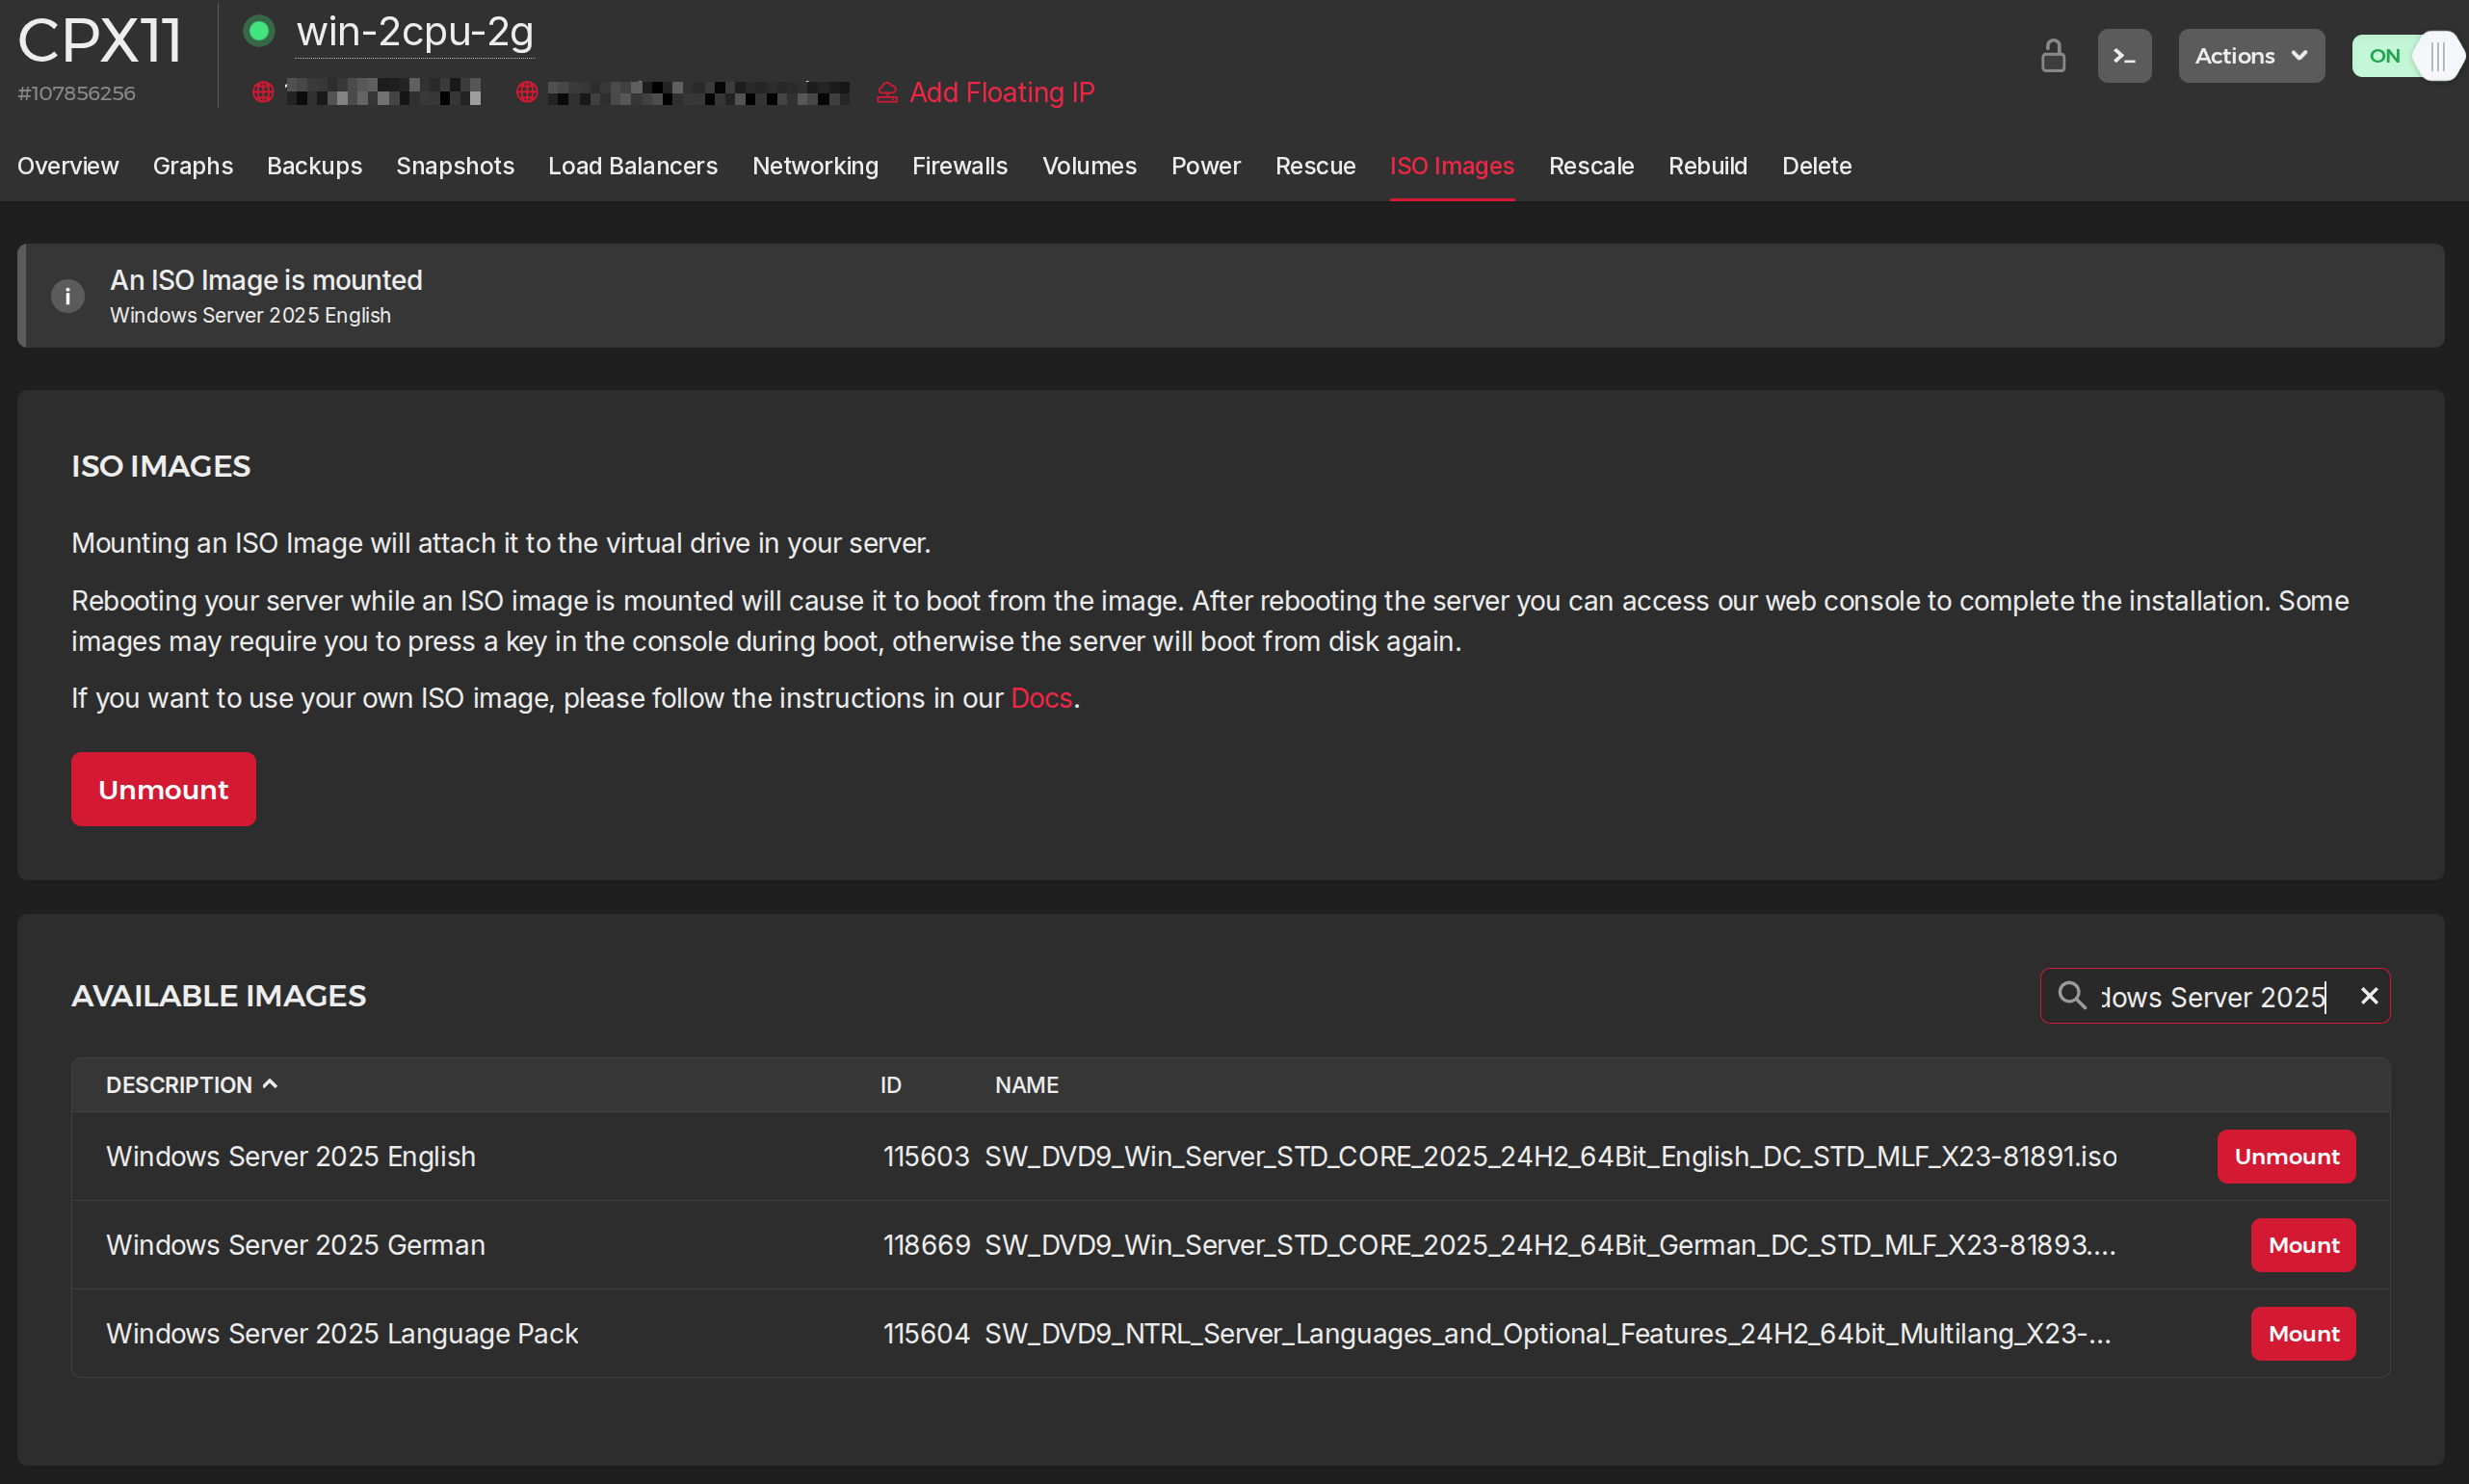
1.2 Mount the Windows Server ISO and reboot
When the instance starts, go to the “ISO Images” tab, mount the Windows Server ISO and reboot the instance. After the instance starts again, you should open the console via Actions -> Console and check the checkbox that says GUI mode.
1.3 Installing Windows Server
Unsurprisingly, installing Windows proved to be harder than anticipated, partly because Hetzner offers no official support, and partly because it’s Windows and I tend to underanticipate. During the installation we’ll have to switch to a different ISO to install the necessary drivers mid install, as they’re needed for properly selecting the drives. Feels wonky and dangerous but it turns out okay.
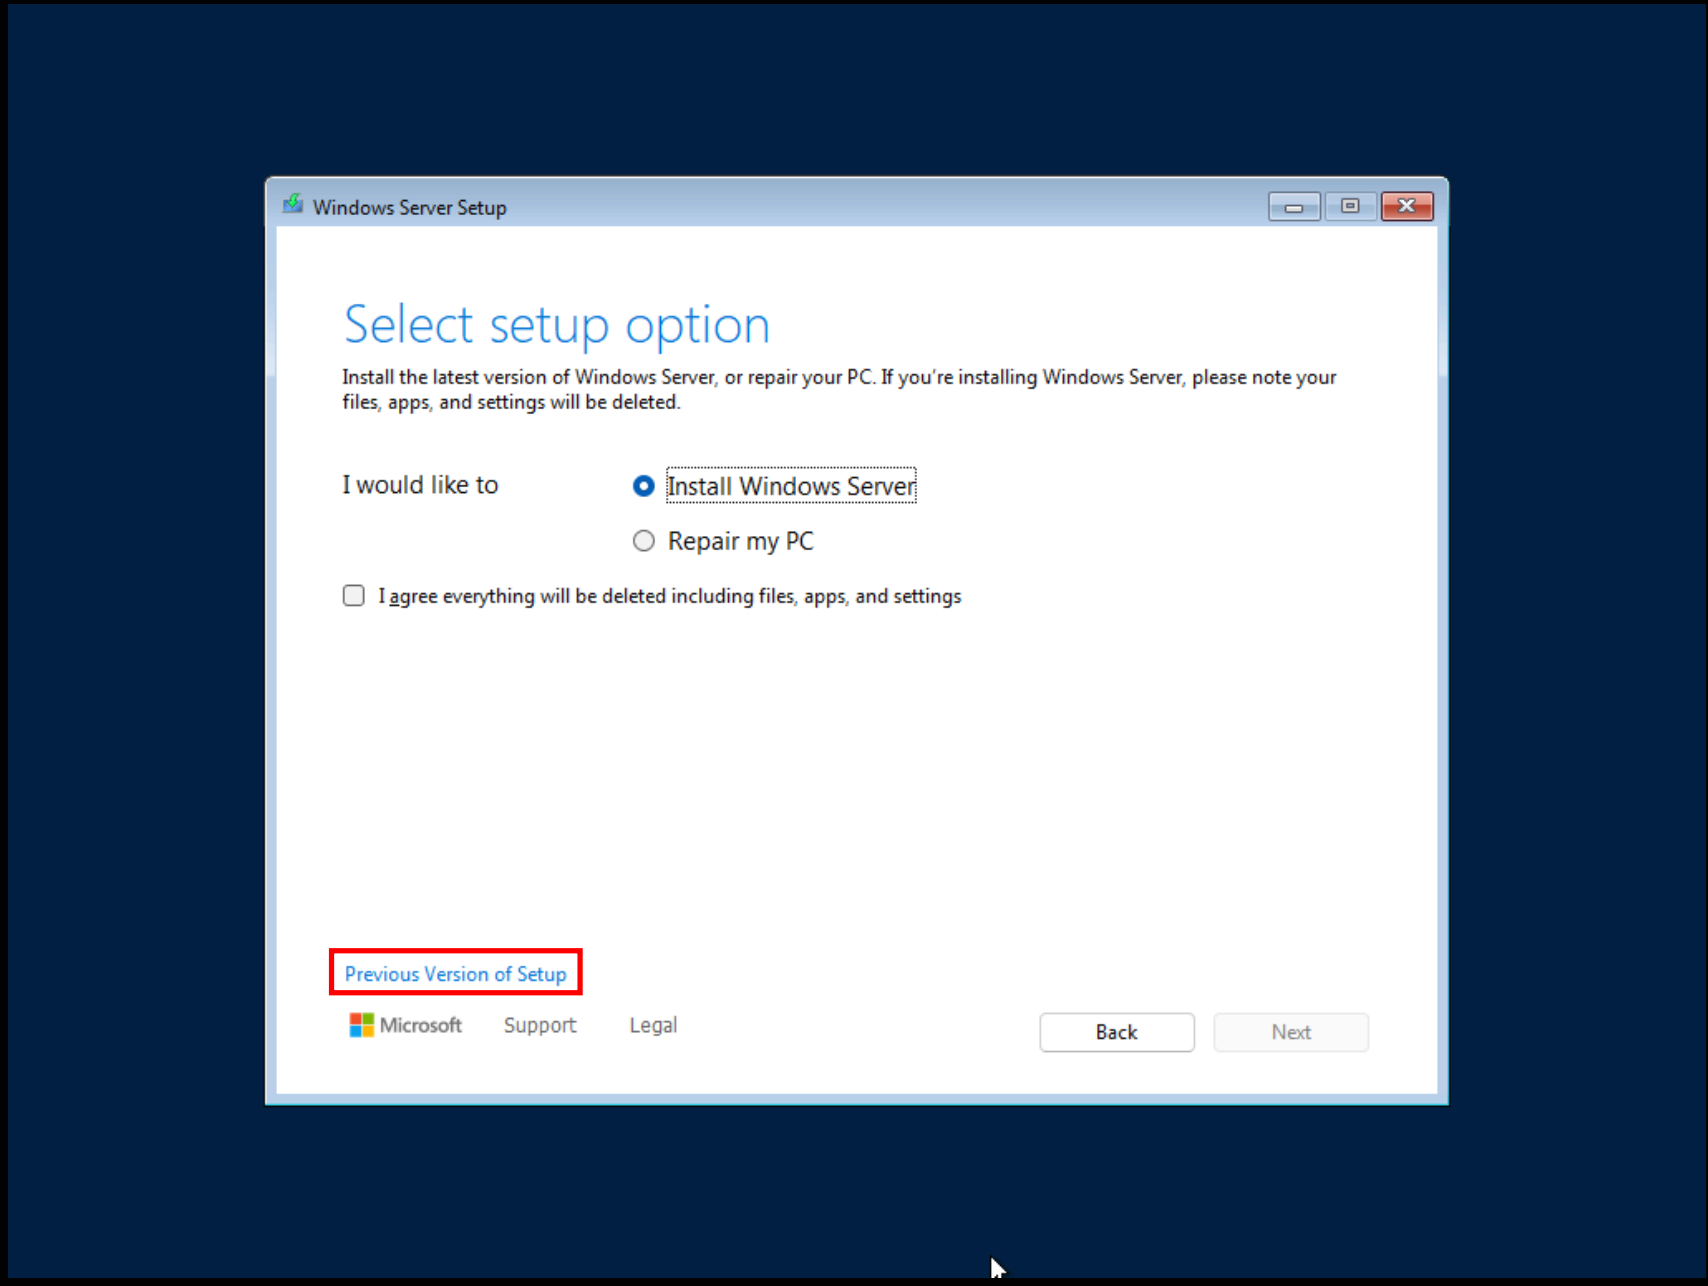
1.3.1 Select the older version of the setup
Soon we’ll install the drivers for storage and networking. I could not figure out5 how to do this with the current version of the install wizard, but it somehow works with a previous versions.
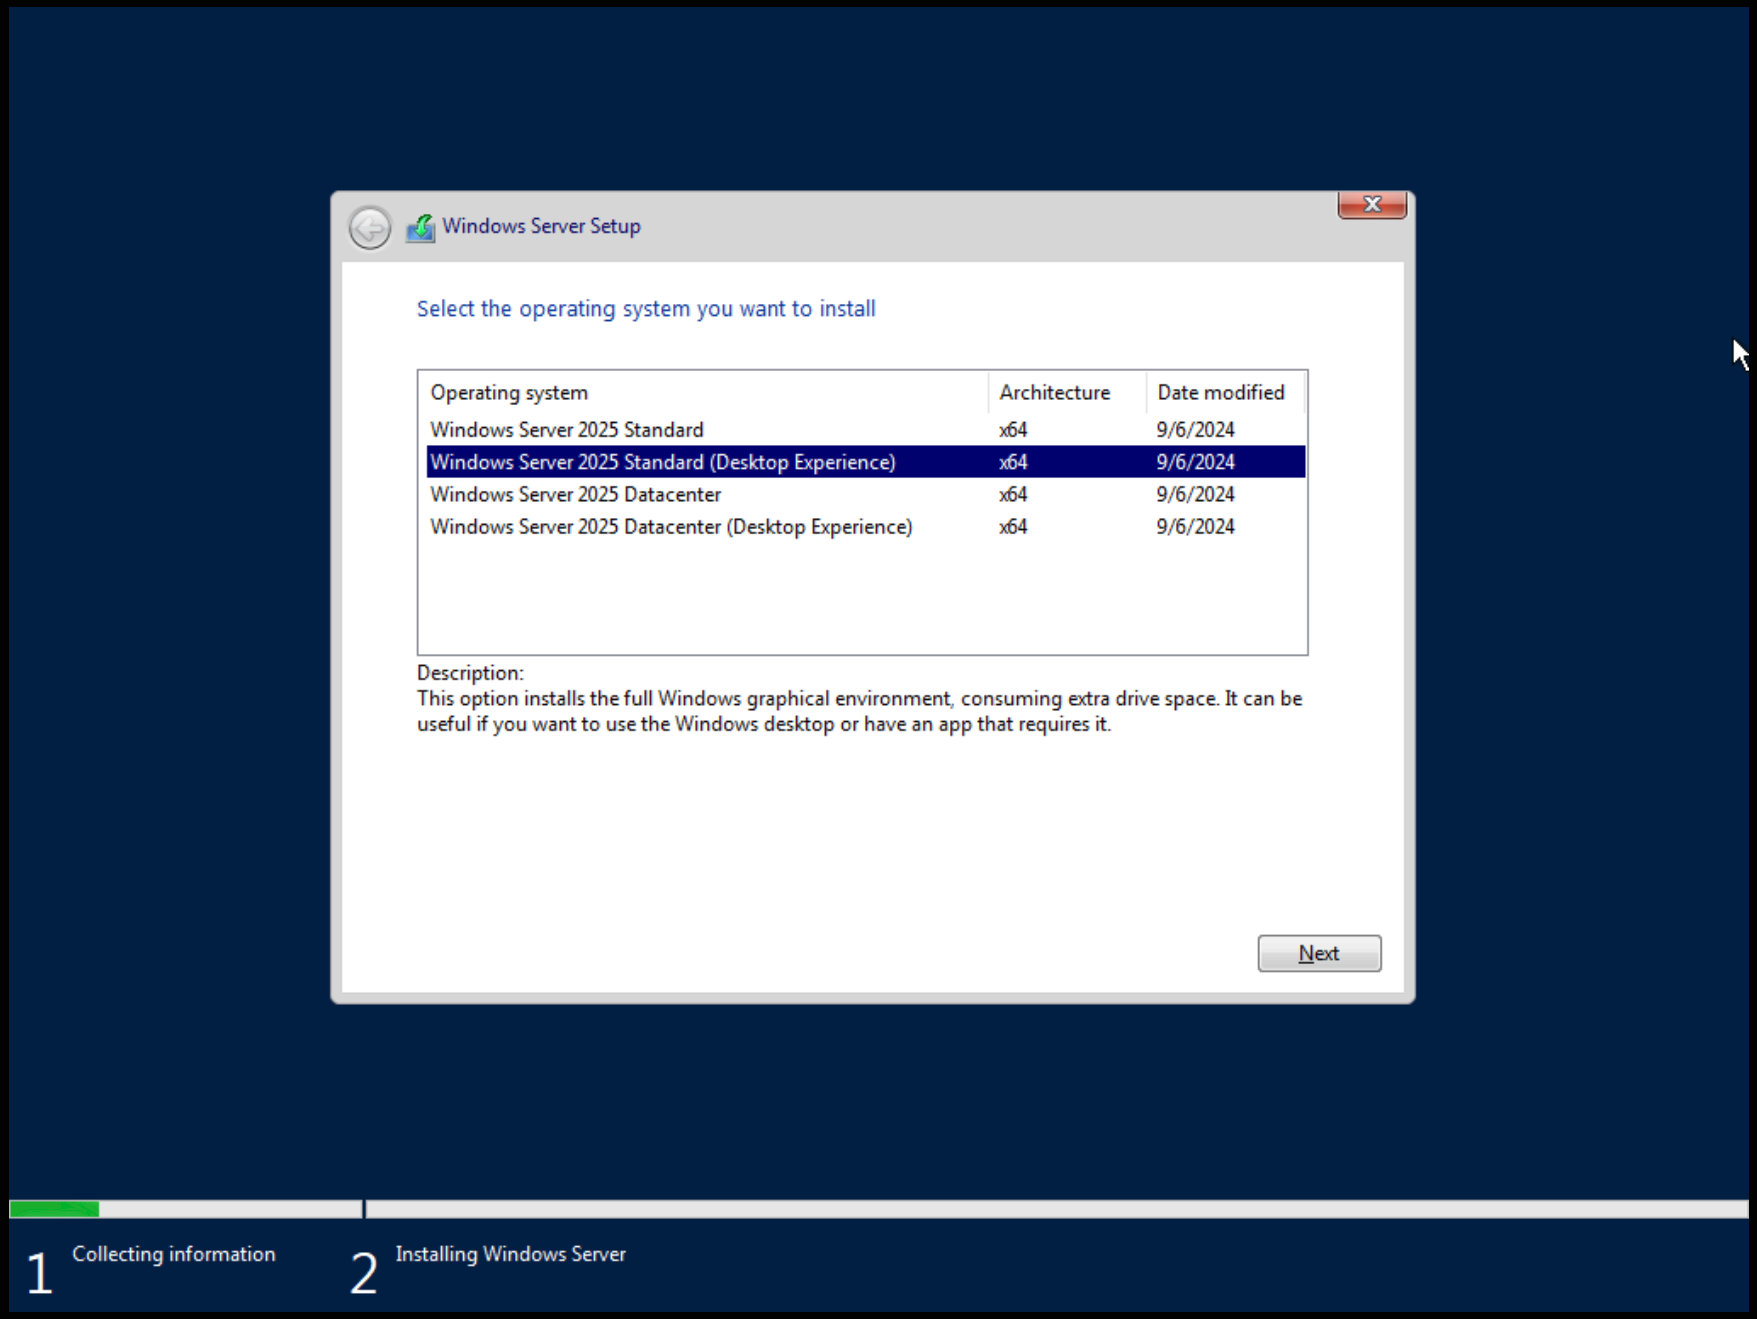
1.3.2 Install desktop
For my use case, which was connecting to the remote desktop to learn about
airplanes and flying, it’s really handy to actually have a desktop experience.
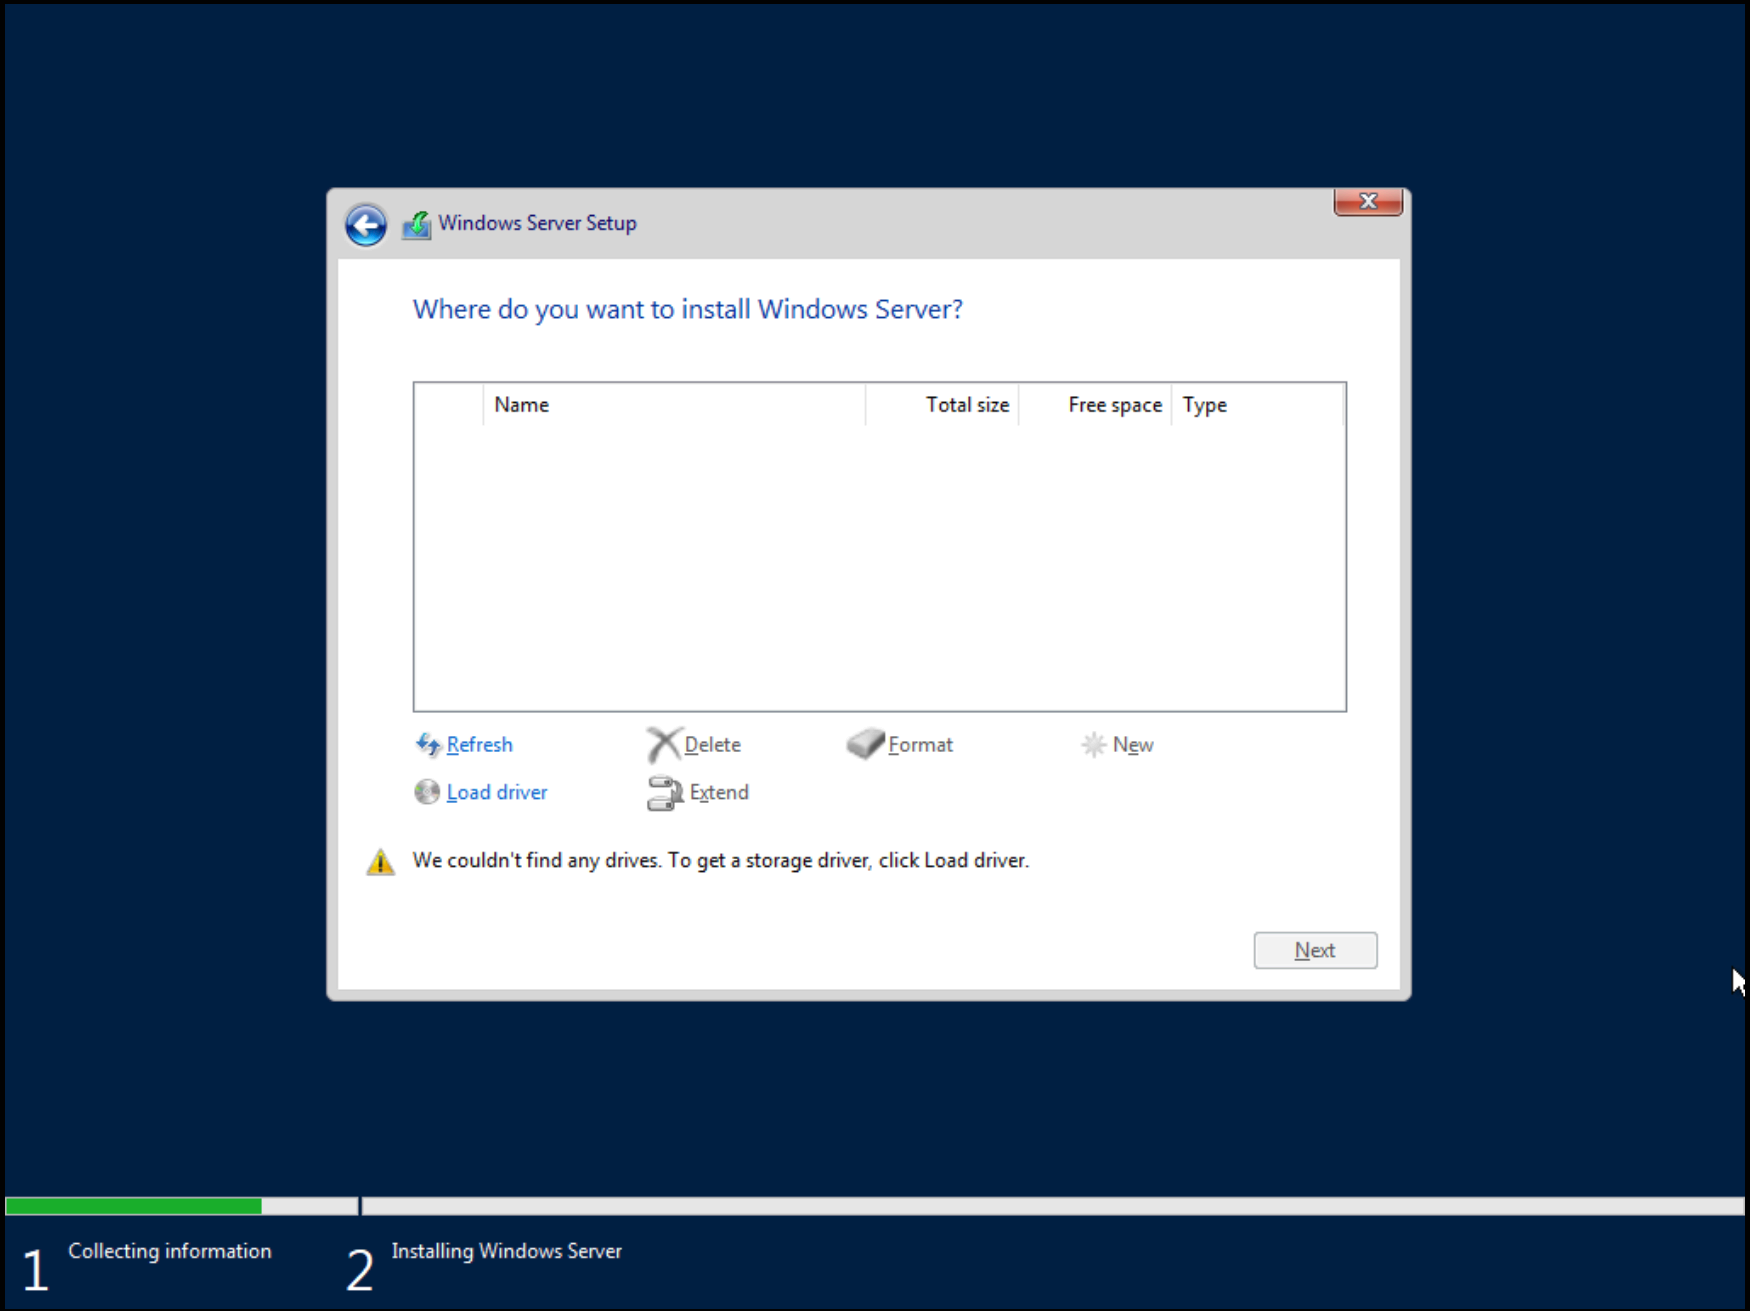
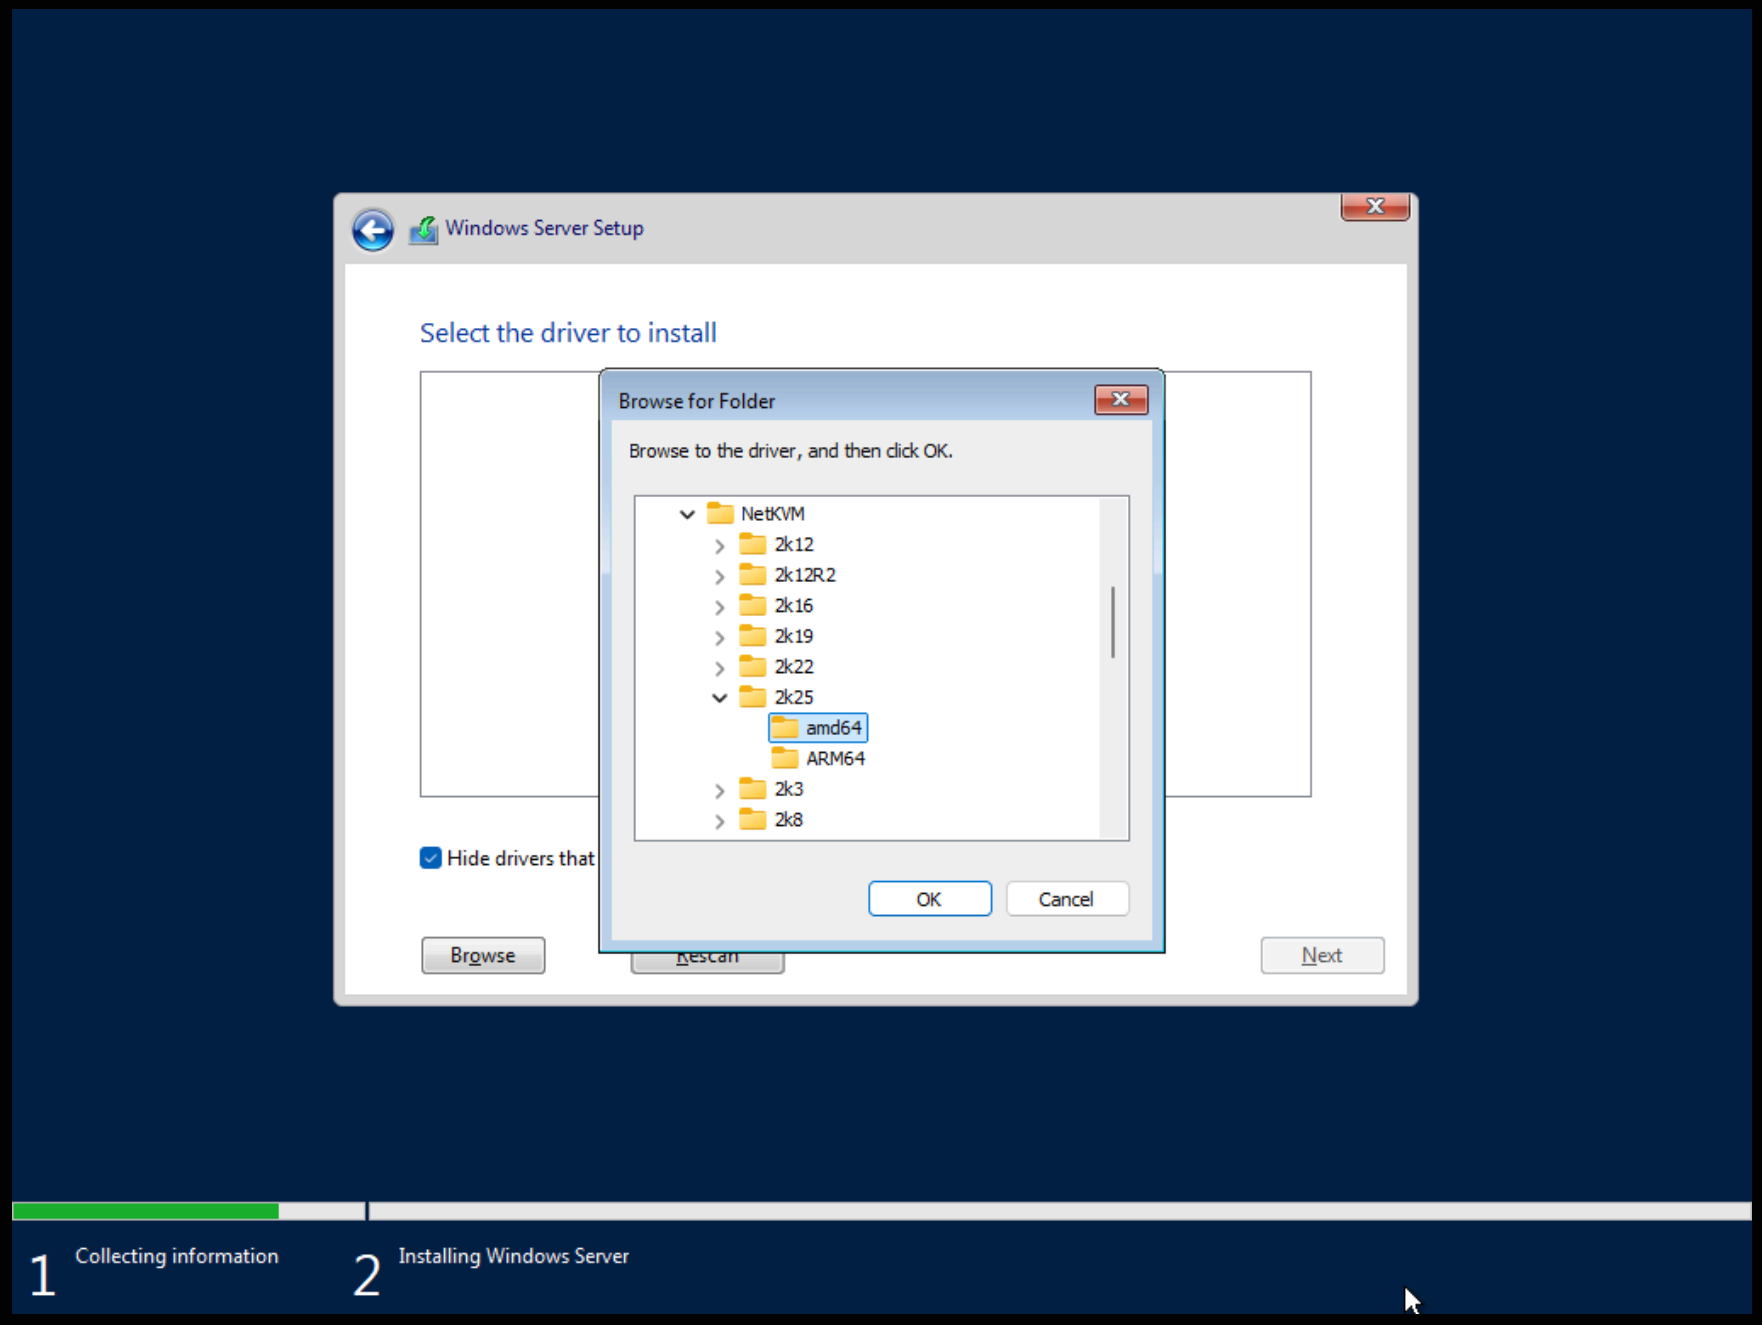
1.3.3 The driver dance
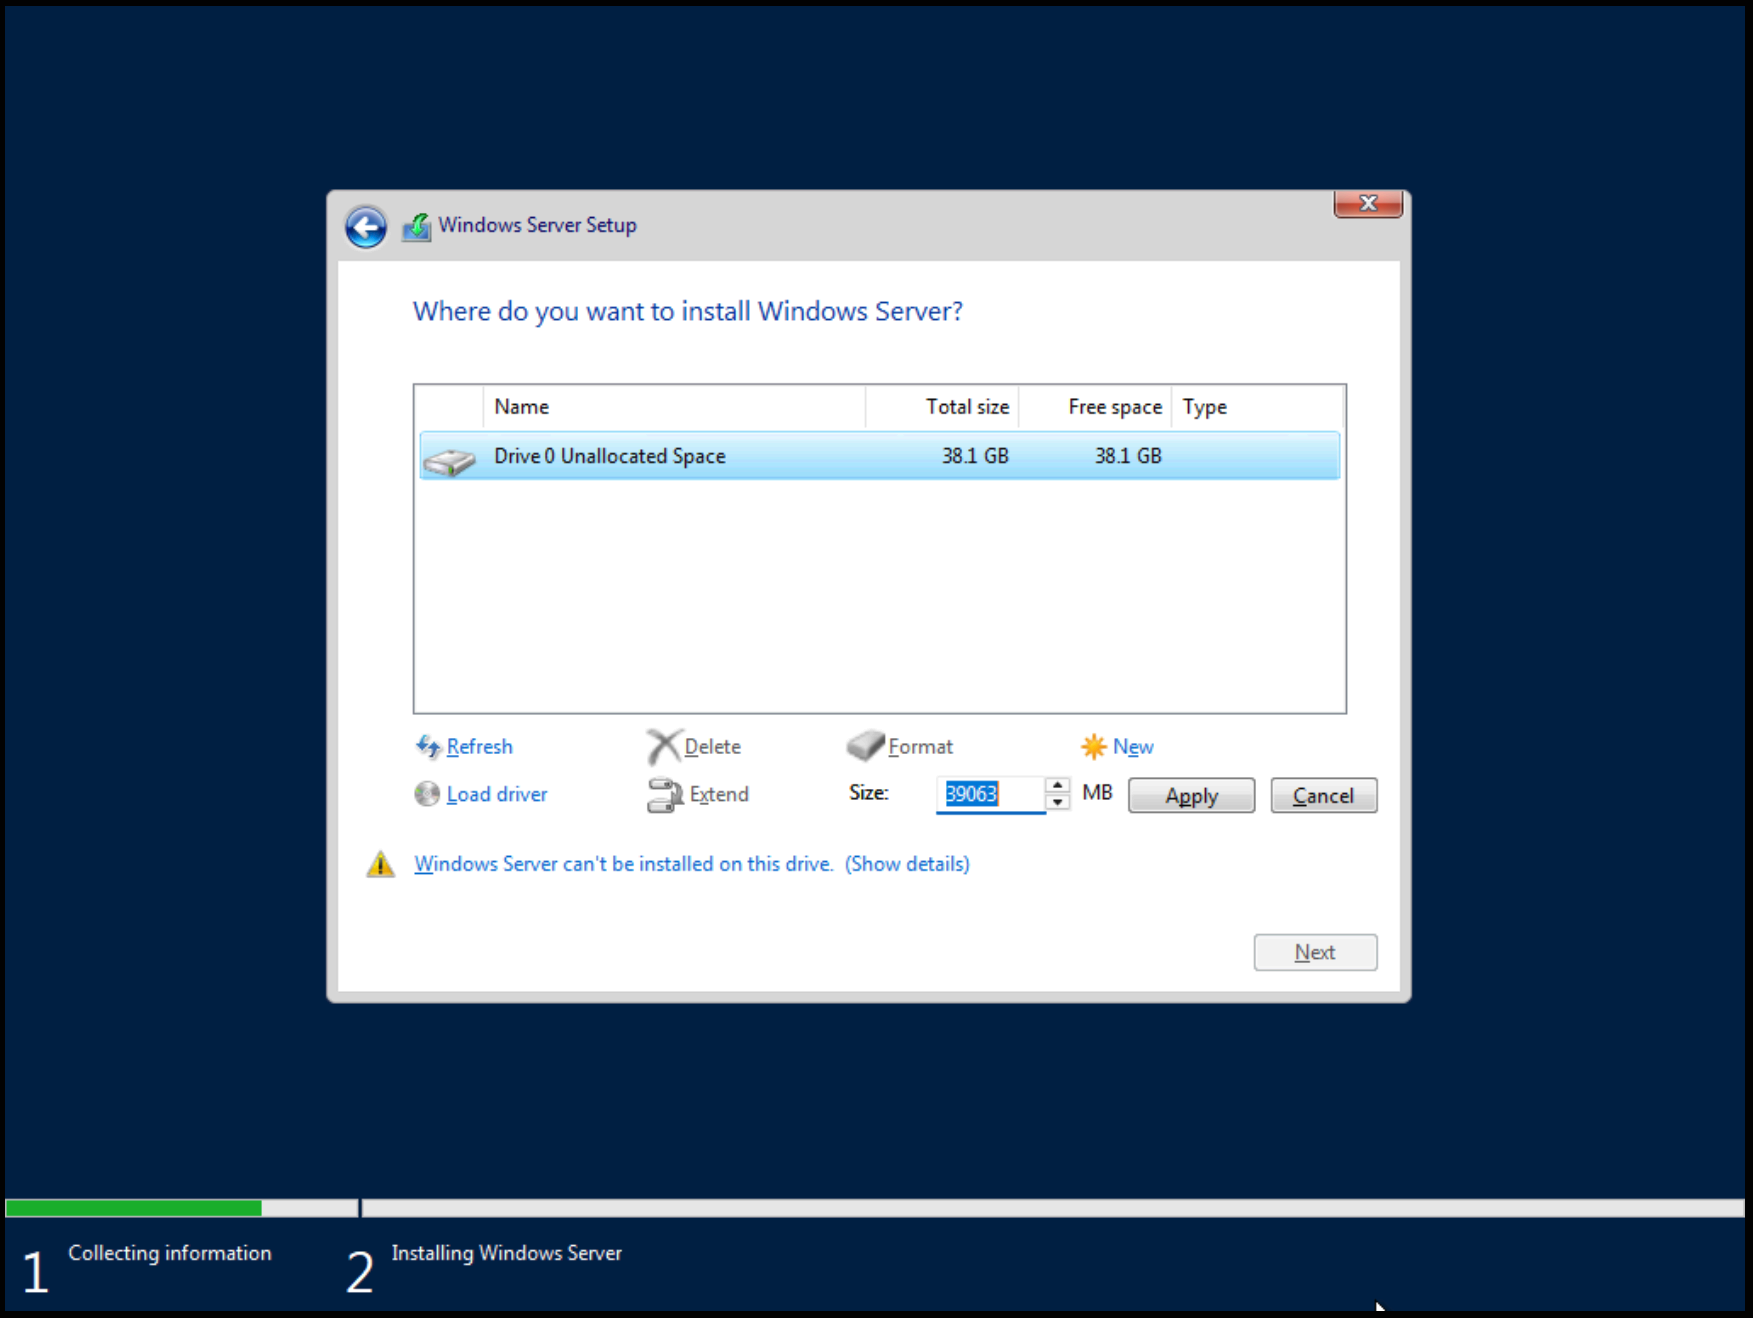
Now it gets a little bit tricky. In order to install Windows to the disk, the
installer software needs to know which disks there are. And it can’t know that
until disk drivers are not installed.
virtio and sorting by ID to install the latest one
available. At the time of my writing, the latest version was 0.1.127.
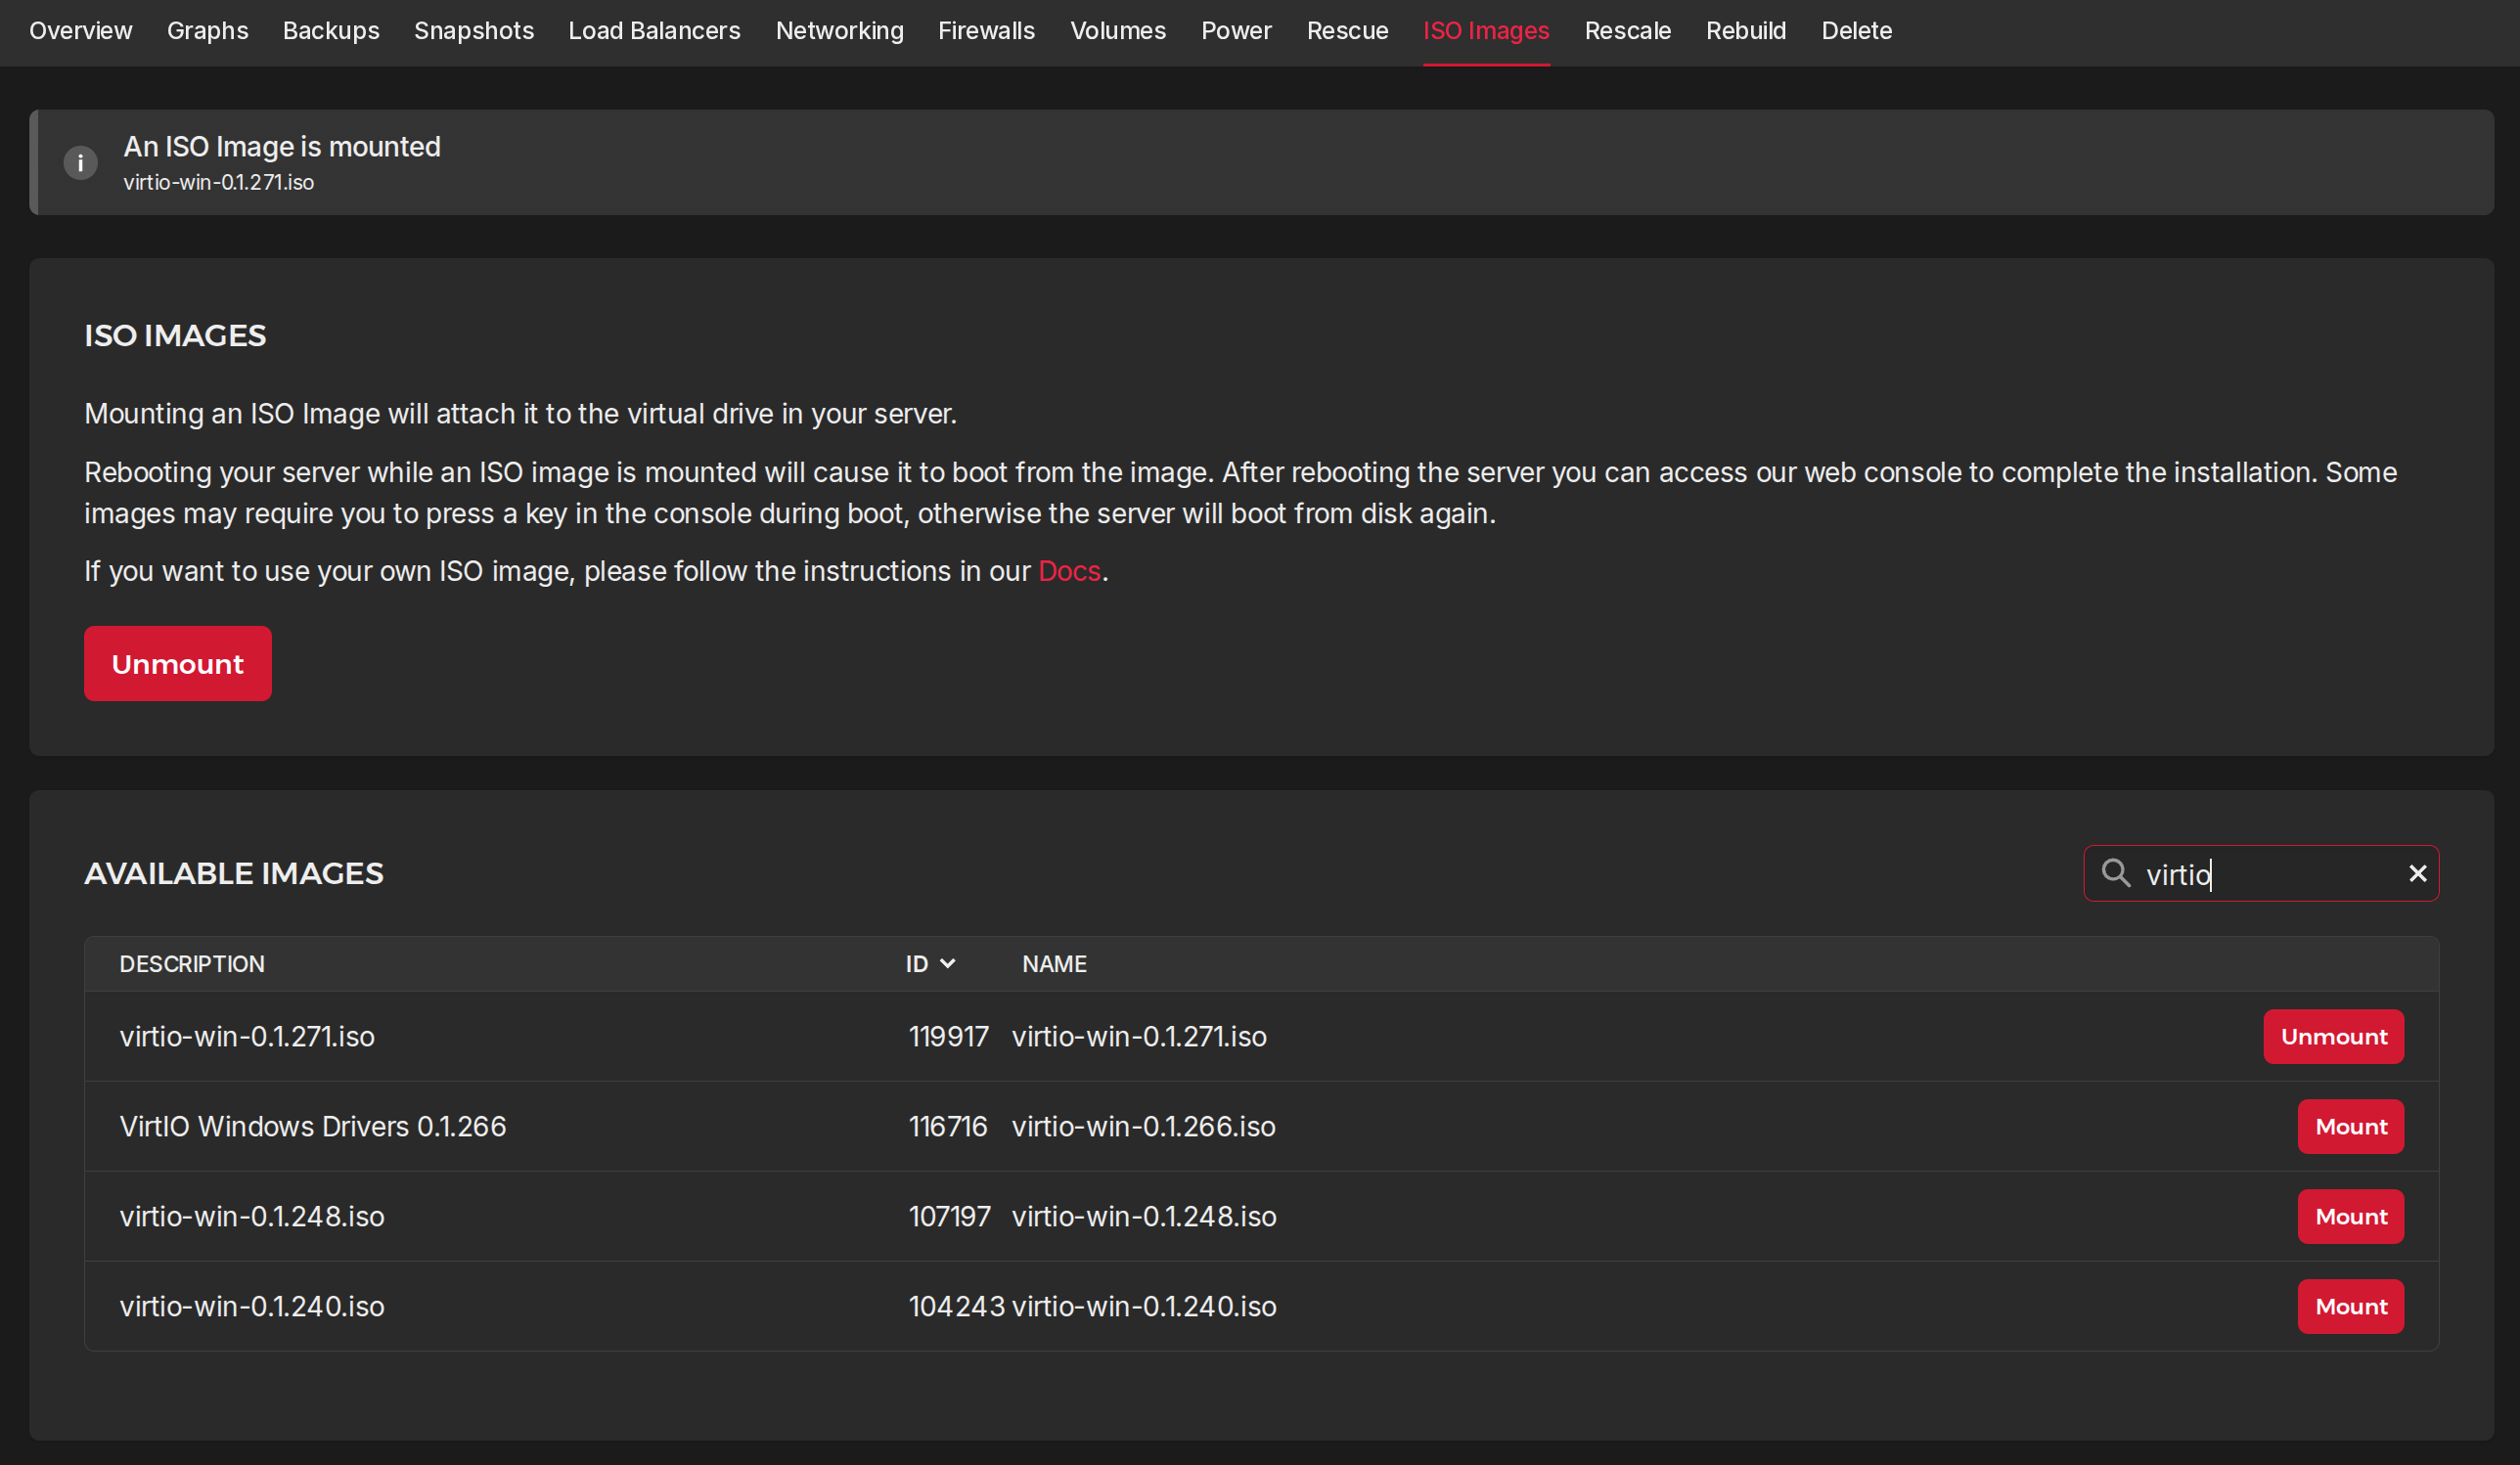
Load driver button and search for the drivers. You
want a VirtIO SCSI for the Windows Server version you’re installing - in this
case 2k25

Bonus: depending on your use case, you may want internet on your Windows Server
instance on Hetzner. You’ll be surprised that you also don’t get internet by
default when you install Windows Server. For that, you’ll have to additionally
install NetKVM drivers in that menu.
1.3.4 Onwards with install
Once you’re done installing everything, go to the Hetzner Console, unmount the virtio iso and remount the same Windows Server ISO you started with.
1.4 Setting up the instance
Your instance will reboot automatically once the setup finishes. Once it does it will try to start another setup because the ISO is still mounted. You’ll have to stop the instance (please use shutdown and not power off!), dismount the Windows Server ISO and restart the instance.
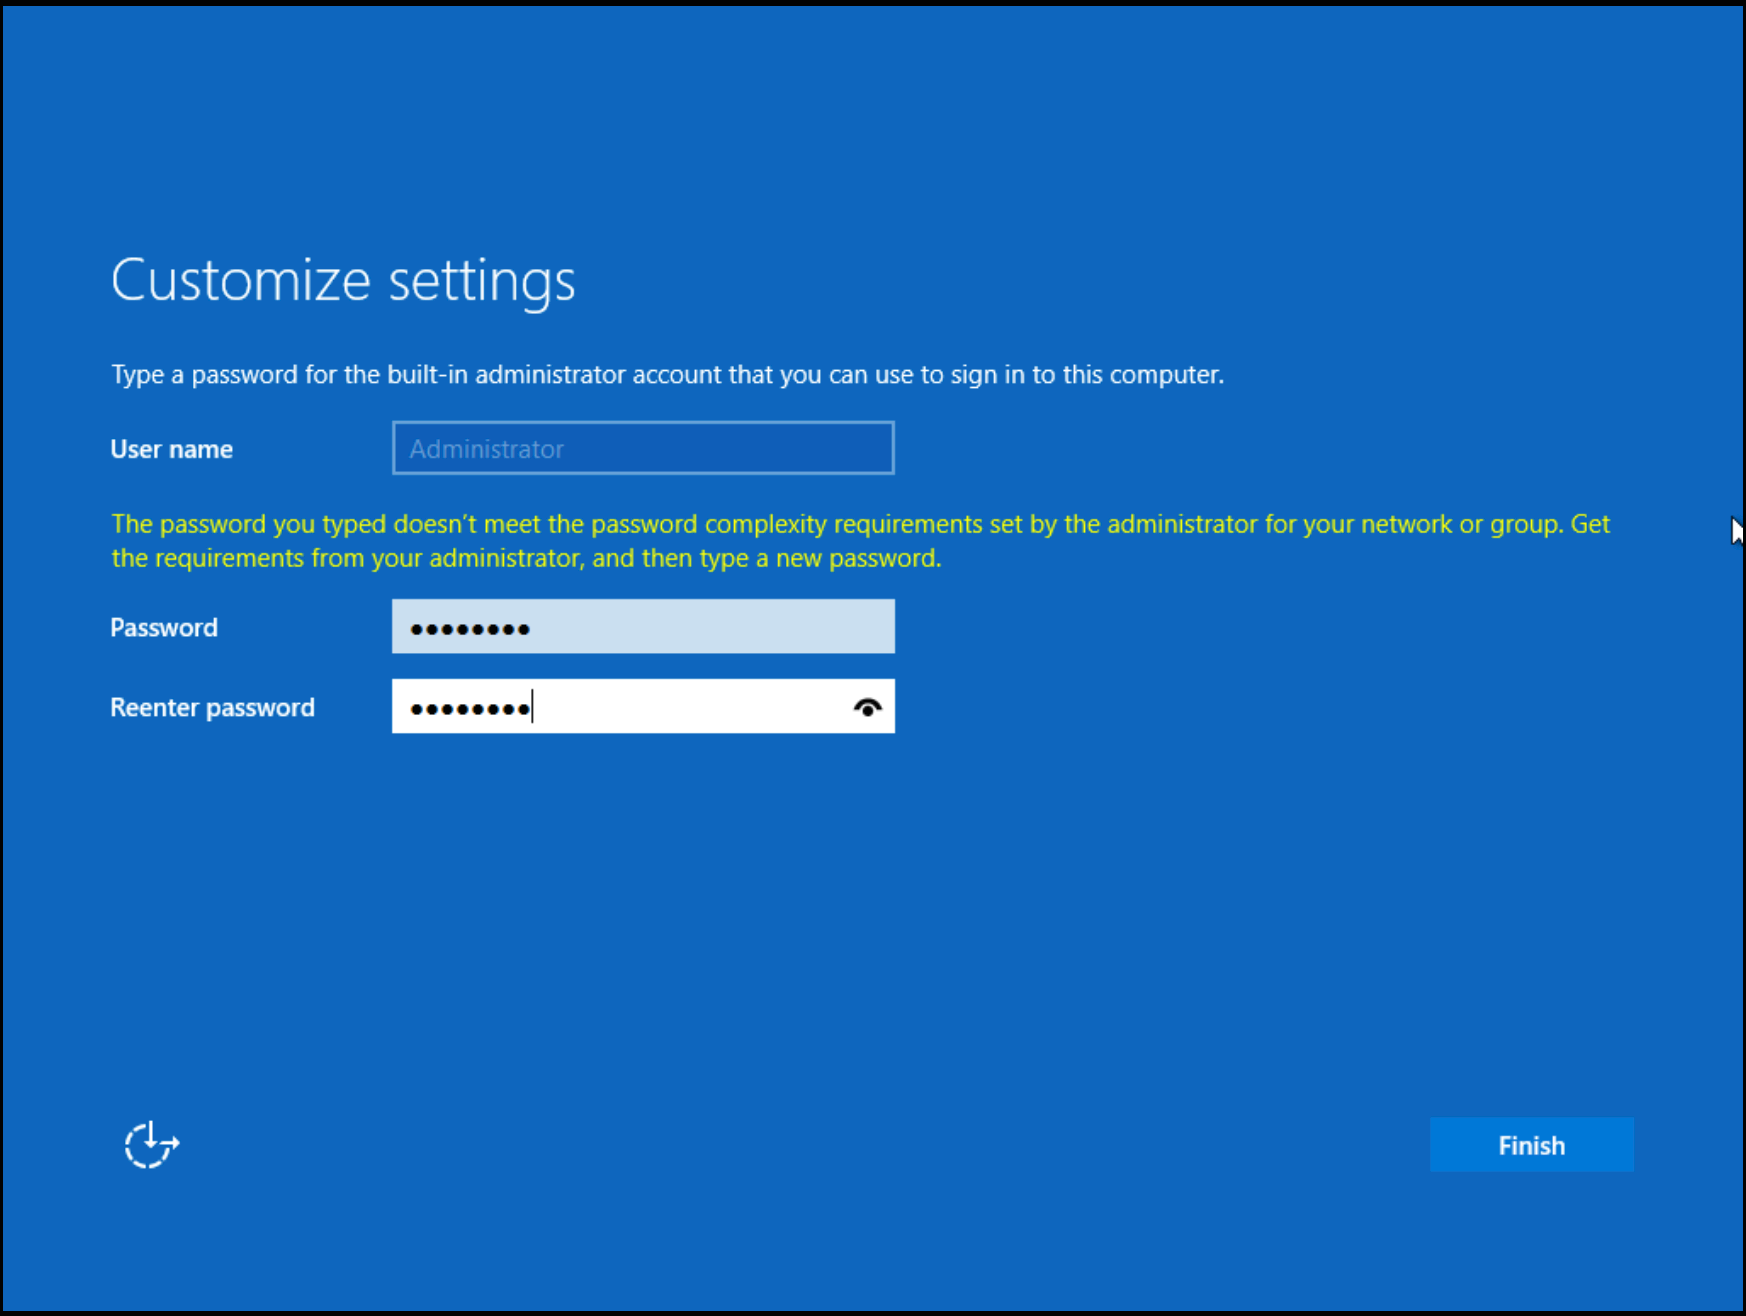
The setup goes as usual, you pick an Administrator password and you’re ready to
login. Windows Server doesn’t seem to spam you with all the unnecessary AI
features you need to opt out of, which is a surprise, to be sure, but a welcome
one.
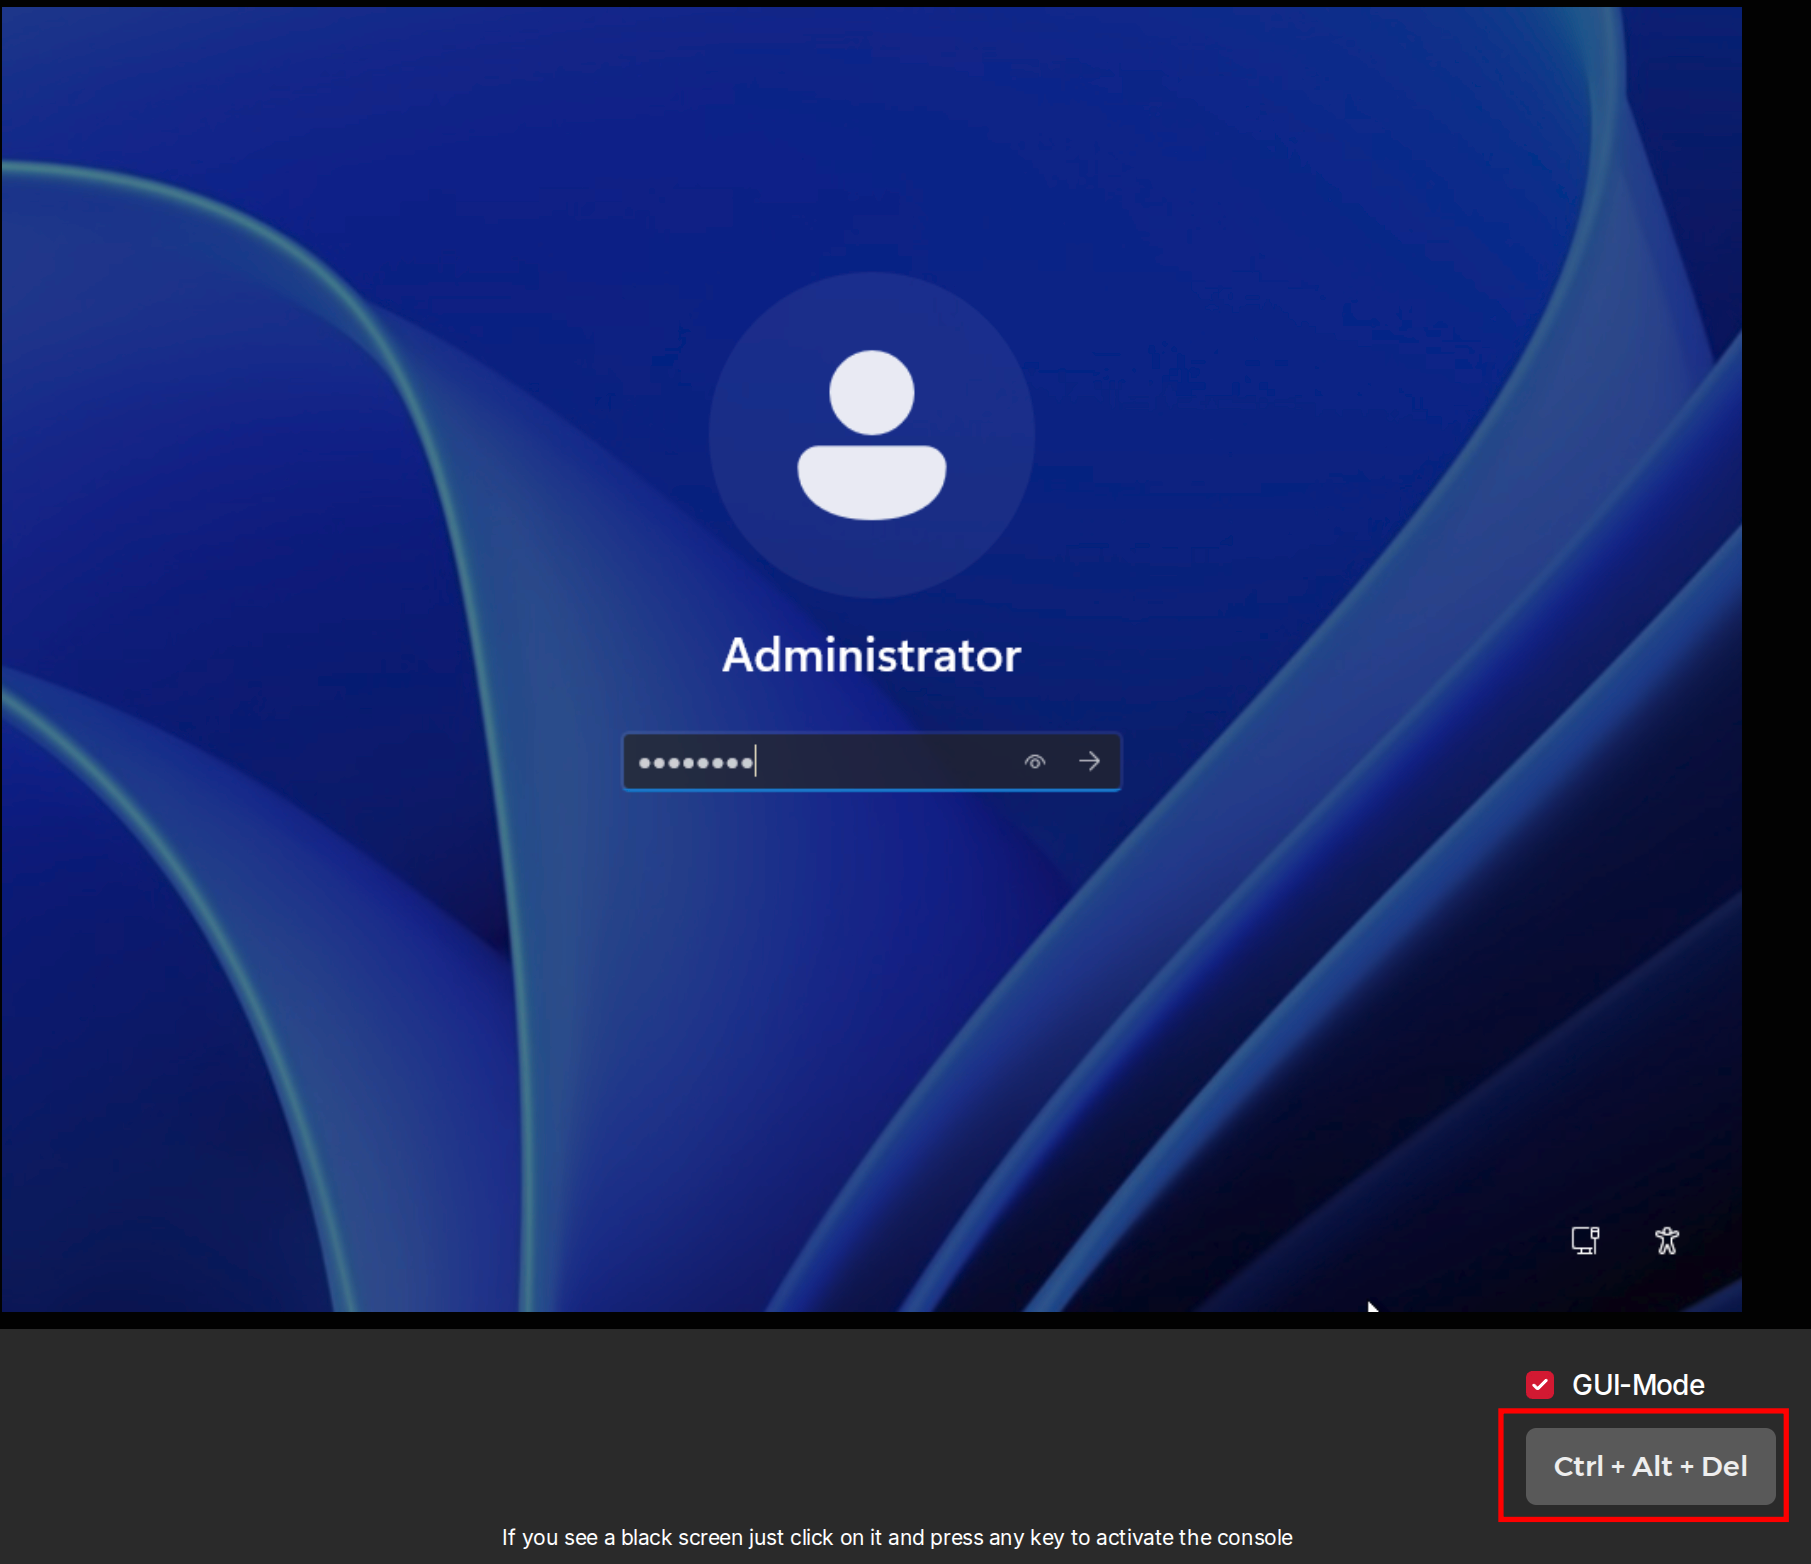
A lil’ gotcha when logging in: you need to press ctrl+alt+delete to login to the
OS, which is pretty difficult when you’re connecting remotely. Hetzner Console
provides a nifty feature, for what I’m assuming is exactly this reason, where
you can send the Ctrl+Alt+Del event to the remote server. Do that and type your
password.
1.5 Enabling Remote Desktop
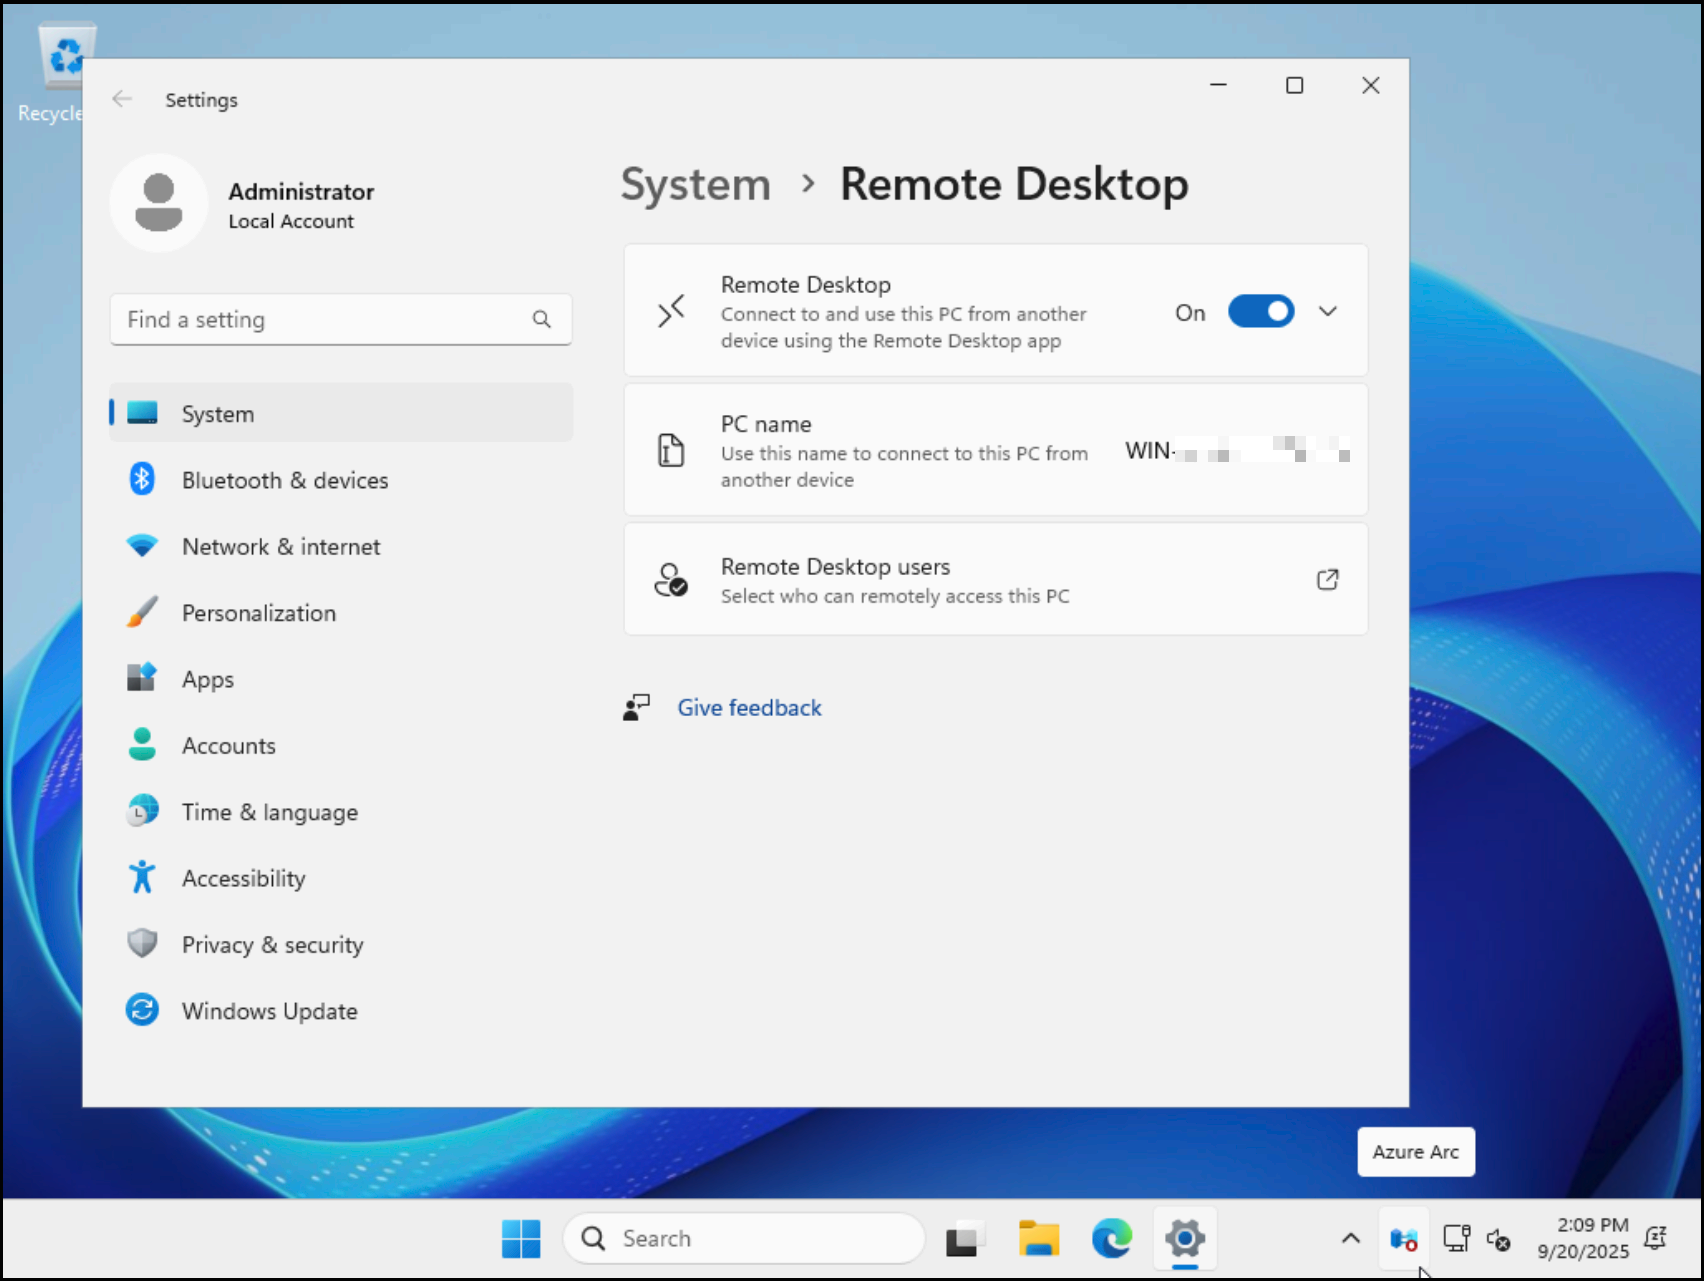
Take note of the PC name, in my case redacted. You’ll need the name for opening up the connection via the RDP client.
And that’s it, your Hetzner instance is now available to connect to from anywhere in the world, if you know the Administrator password. That’s way too big of an attack surface area, though, and I reduced it by connecting through Tailscale.
2. Setting up Tailscale
I actually don’t have much to add than what’s already there in the two blogposts I used while setting this up, so I’ll just link them in separate sections.
2.1 Installing Tailscale
https://tailscale.com/kb/1022/install-windows
My only mistake here was that, since it was my first time using Tailscale, I initially set up everything with Google SSO (I did the android app first), and proving it was really me who just logged in on a remote Windows instance turned out to be a big hassle. So if you’re also starting with Tailscale, just create a normal account 😁
Once you set it up, don’t forget to actually turn on the Tailnet.
2.2 Firewall setup
https://tailscale.com/kb/1095/secure-rdp-windows
Nothing to add here. Short, clear, and to the point. Double check all the values.
3. Setting up remote desktop on Android
3.1 Install Tailscale
This was the part of my setup I actually did first, and as previously mentioned, I created my account with Google SSO out of pure laziness. You should definitely login in with the same method that you created the account, though.
Before you start setting up the RDP client, and if you did the Tailscale setup in Step 2.2, you should switch on the Tailscale network. Otherwise, you won’t be able to connect.
3.2 Microsoft App
Just around the time I started setting things up, Microsoft deprecated their Microsoft Remote Desktop app, and turned the attention to a new application called Microsoft App. I’m guessing that not one person in the development chain thought about how un-search-engine-able that term is.
The first thing you should absolutely do is to add an account. In my case that
was the very account I set up as the administrator. The reason is that otherwise
you’ll have to enter username and password every time you try to login. I grew
weary after the third time or so.
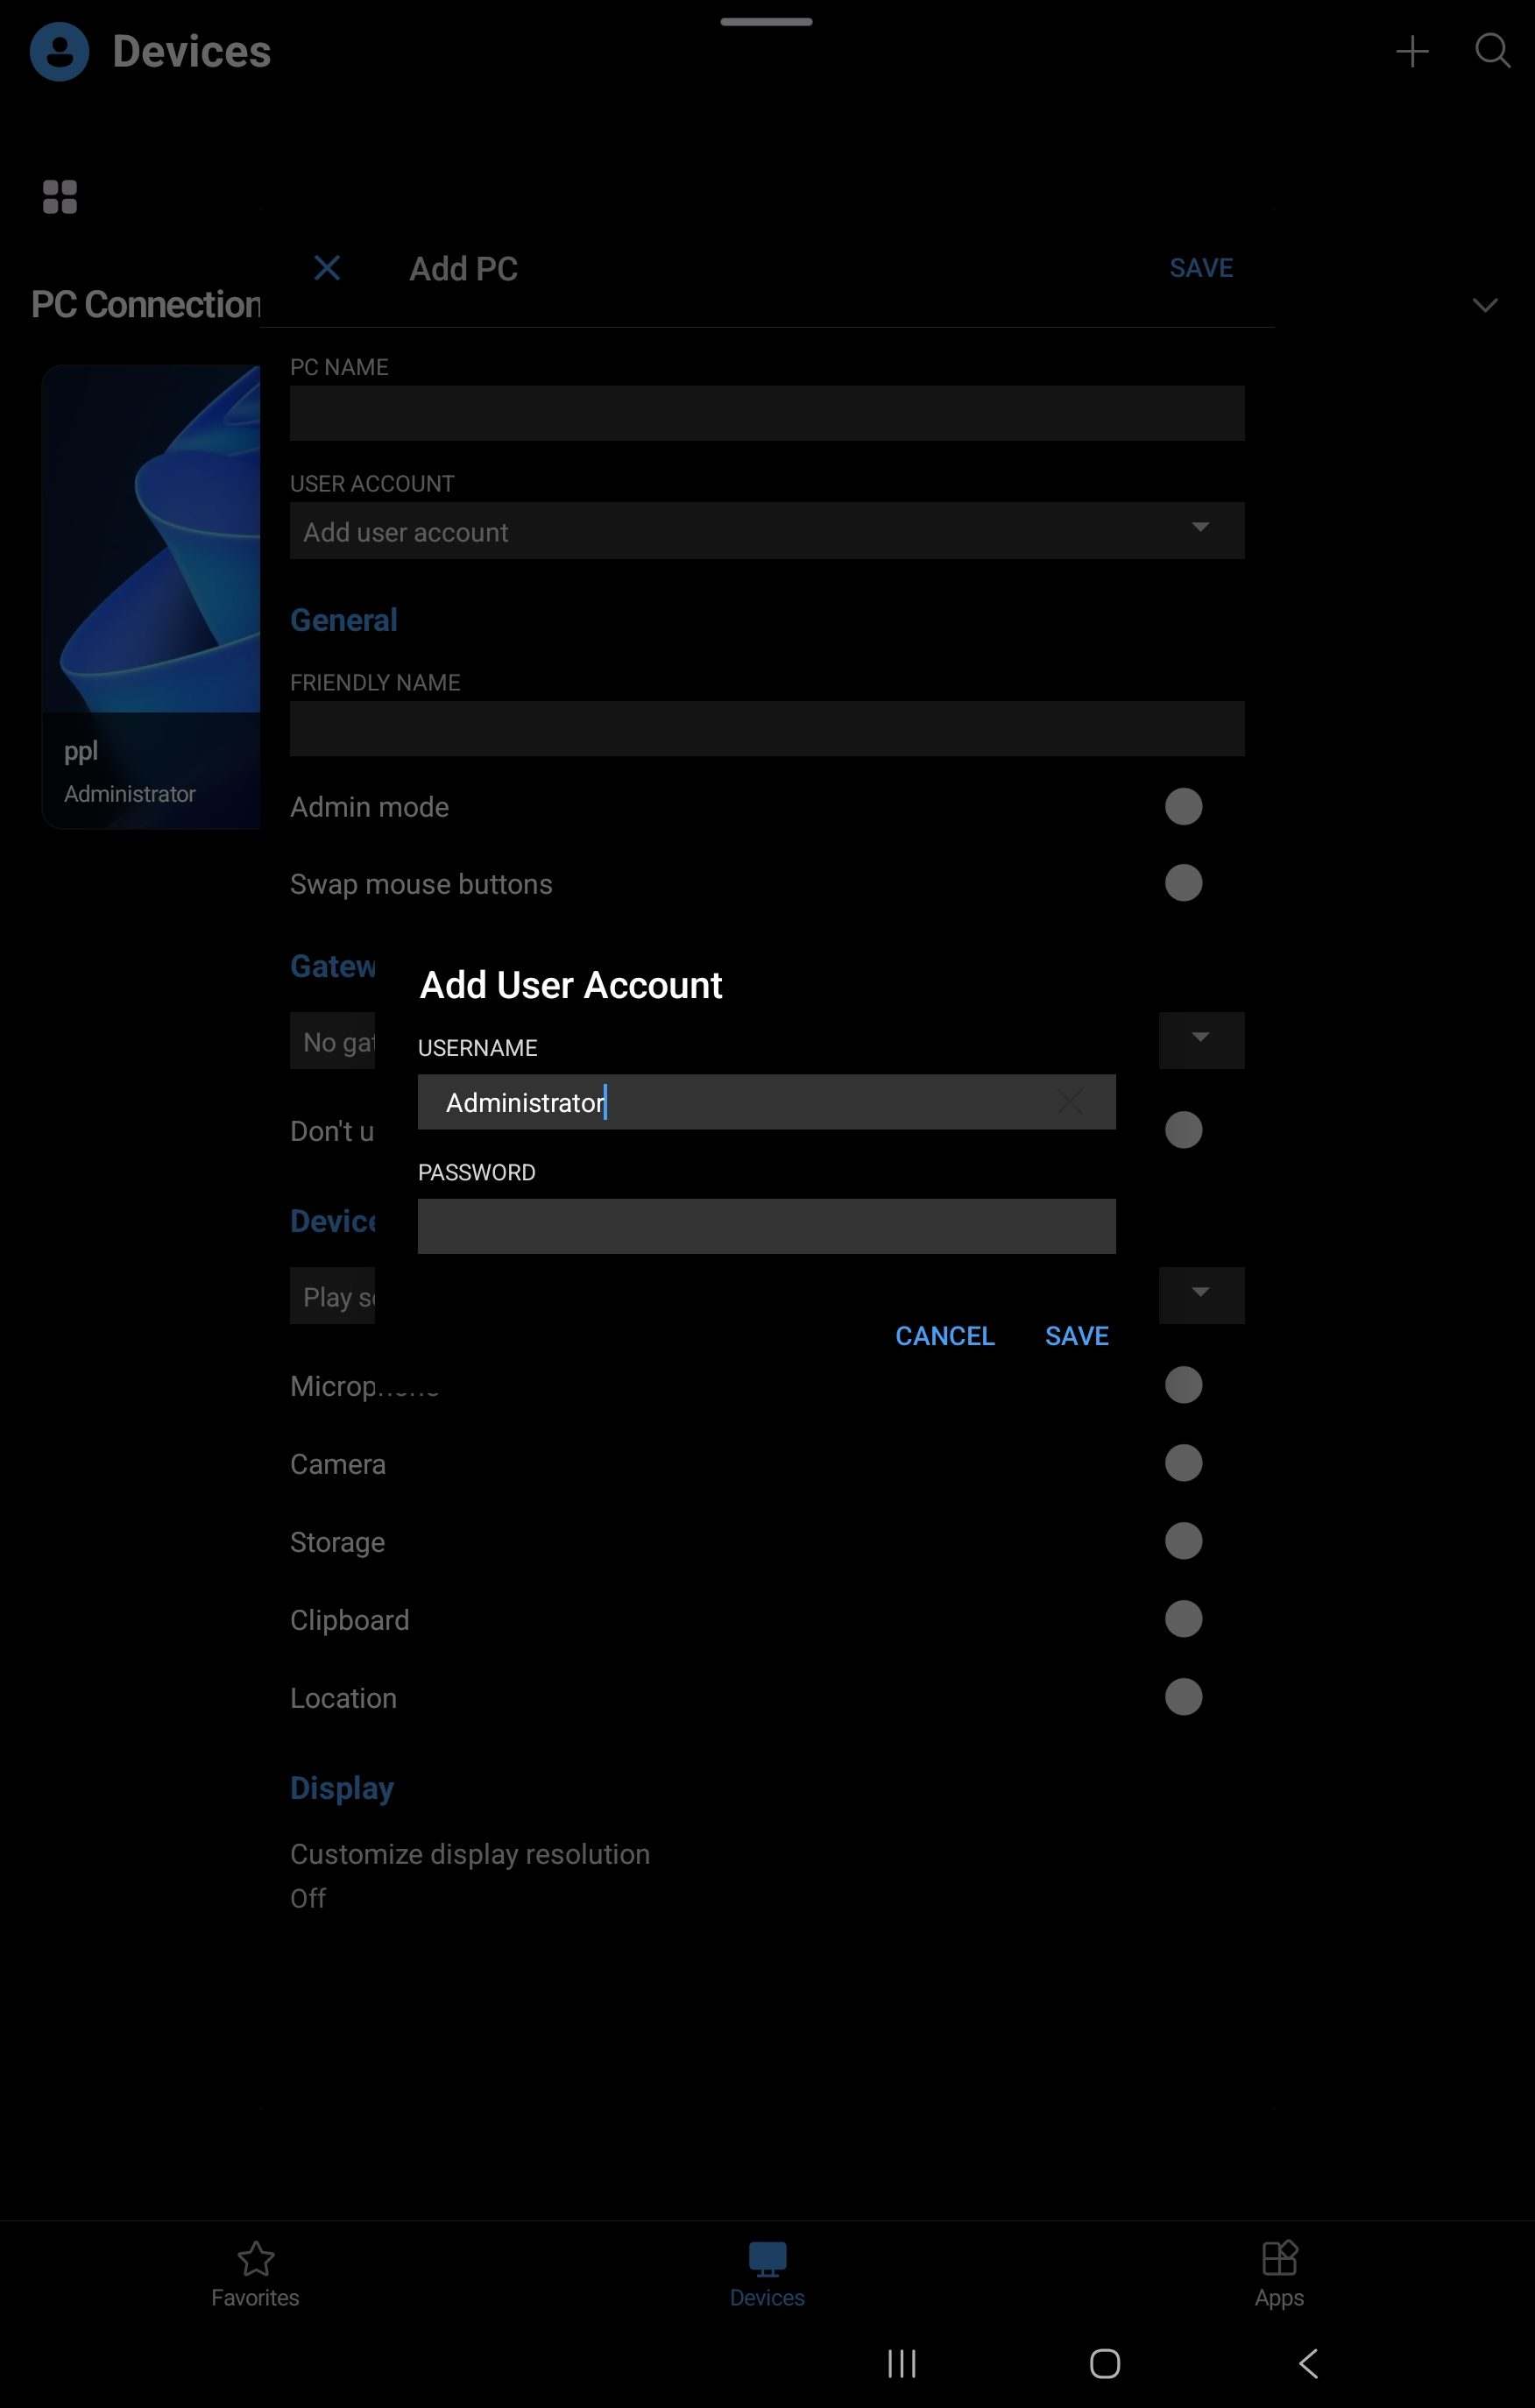
PC name you should enter the name of the PC from Step 1.5. Leave all
other settings at their defaults.
And that’s it! If you did everything correctly, you should see your Microsoft Windows Server instance in Microsoft App. If you have trouble connecting, 1) check the PC name you entered in the Microsoft App, 2) check if your tailscale network is on for both the remote instance and your client, 3) check your firewall setup from Step 2.2.
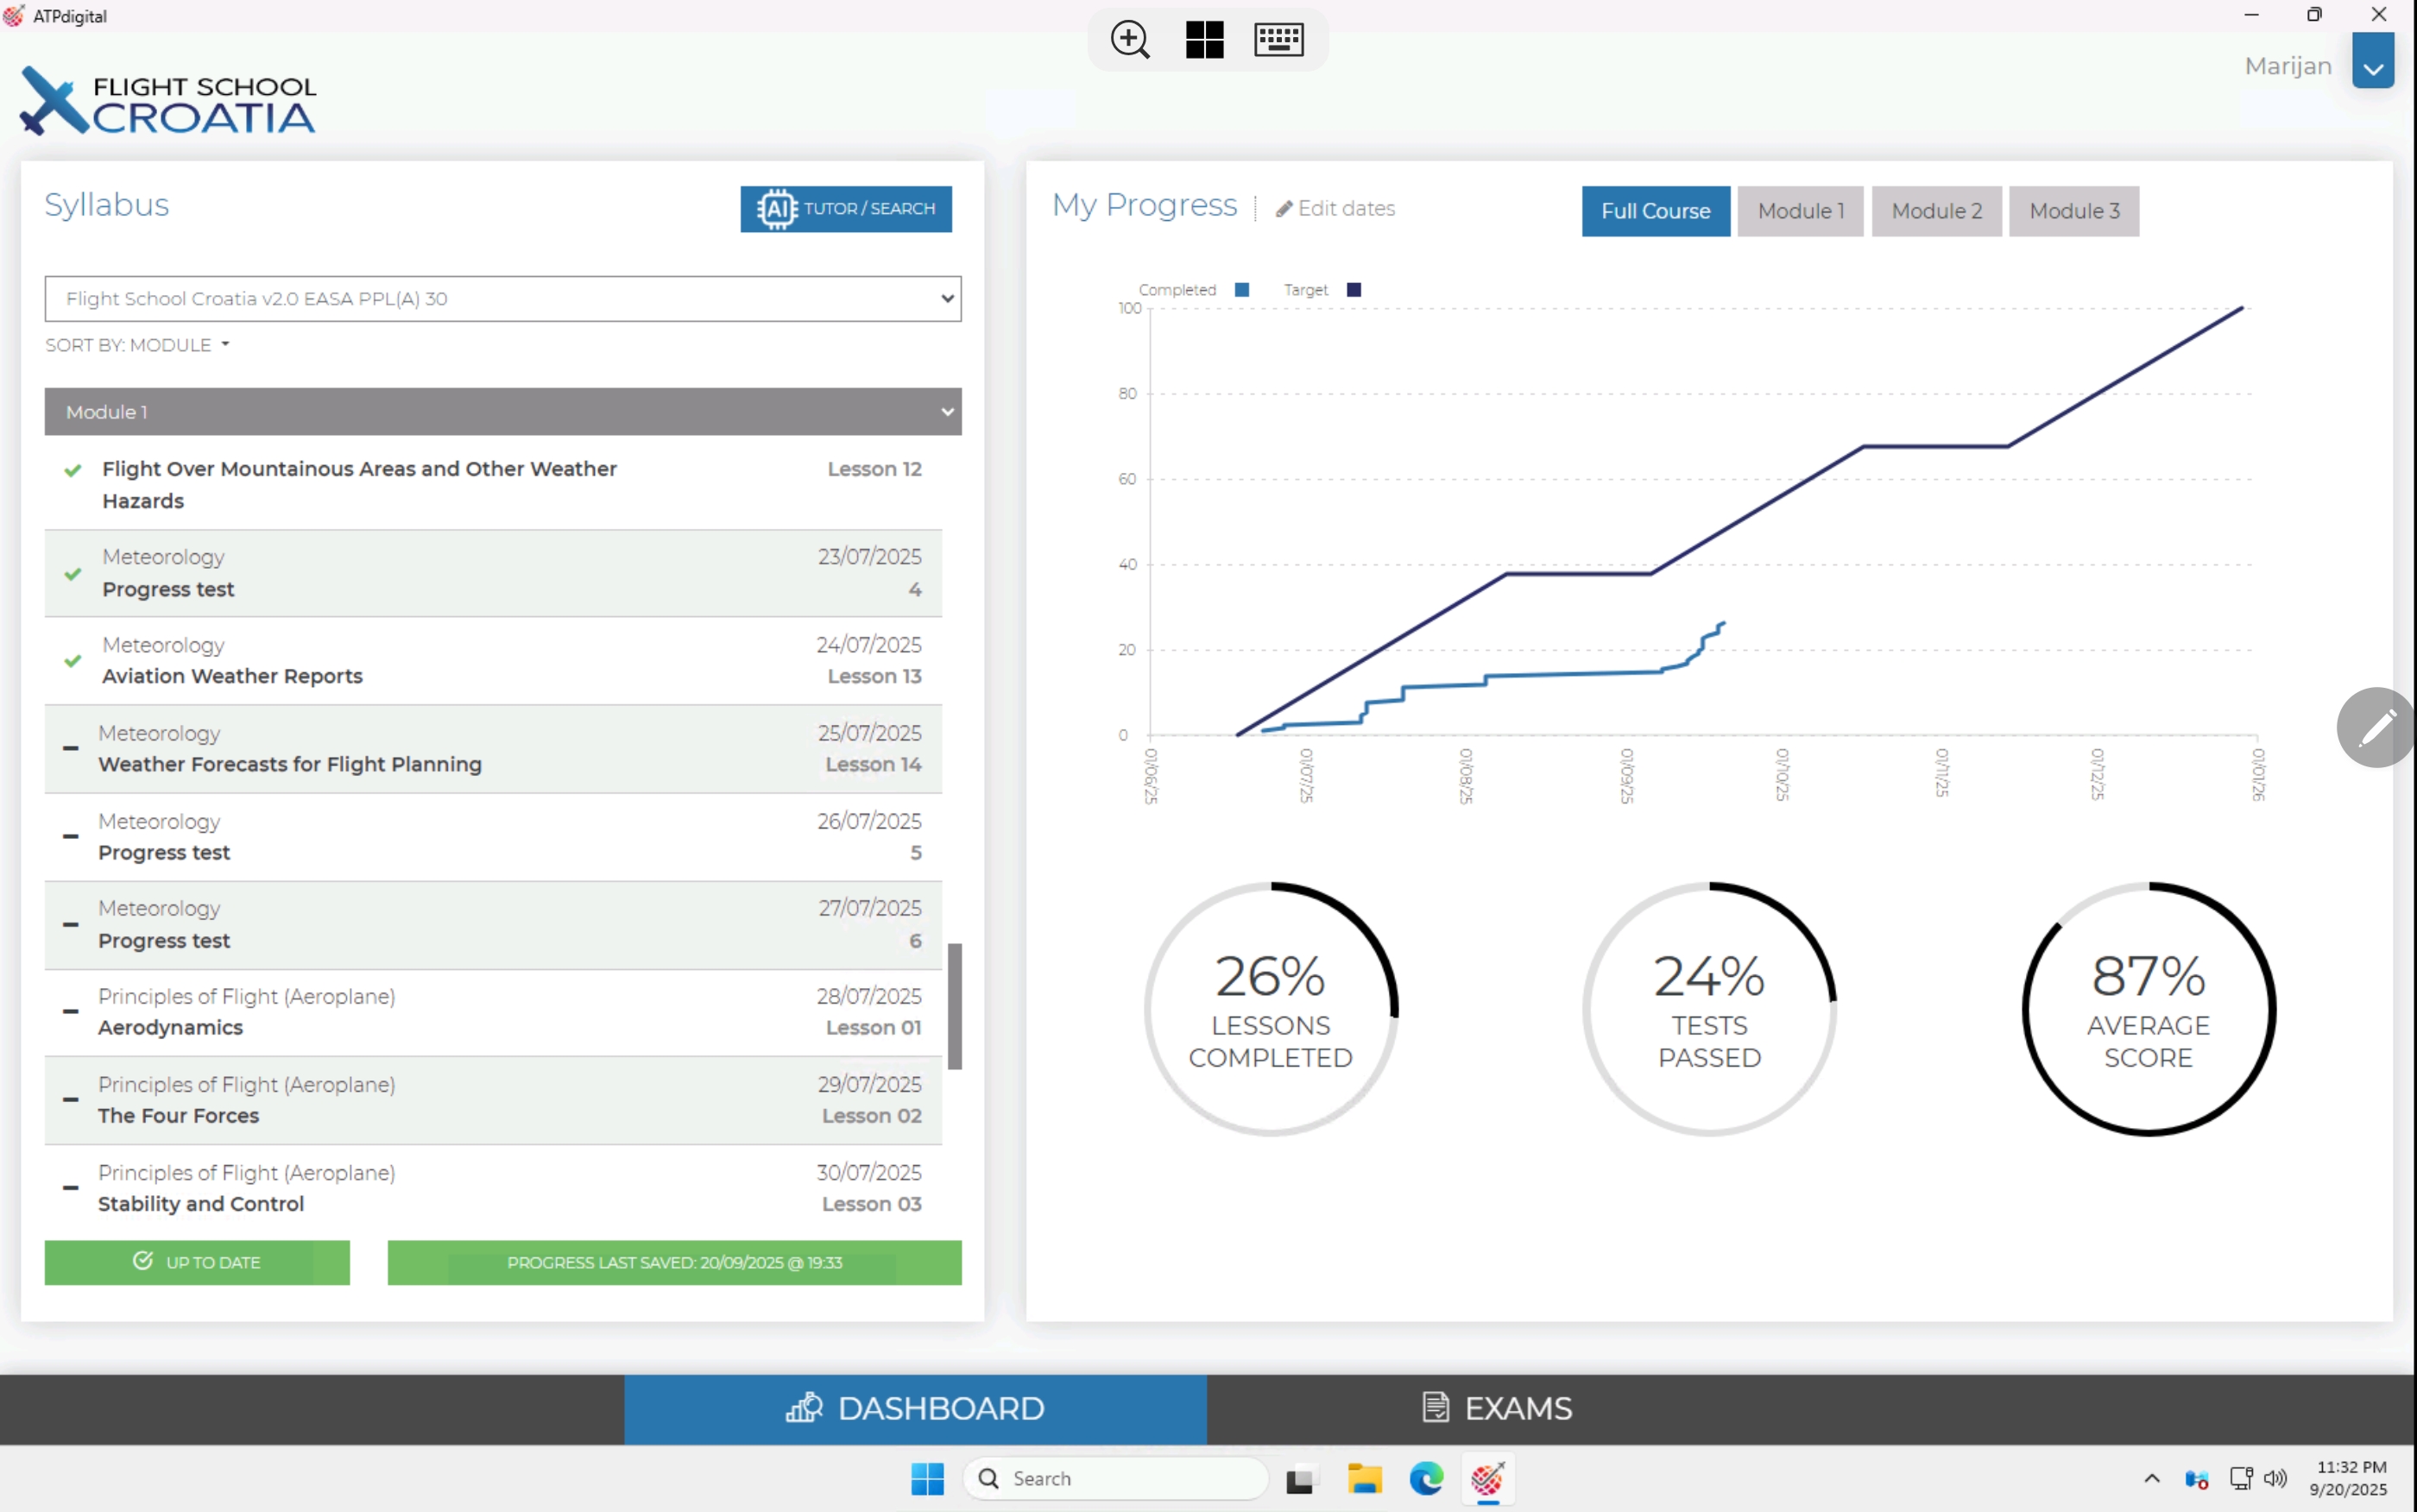
Now you can do whatever you need. For example this is what I see when I remotely
learn about flying:
And this is how it looks IRL:

-
Actually, that’s not really true, I have a dual-boot and I use it solely for those 3h a year when I get the urge to play stuff. I did not want to pollute my de-facto overpowered steamdeck with a PPL software ↩
-
Definitely not a friend ↩
-
I am aware of, and personally agree with, this post from Alex Martsinovich. That said, that sentence was a genuine learning moment for me, and I could not summarize it any better. ↩
-
now no one else can learn the theory except me ↩
-
If you do it please let me know! ↩
Back to main page